Wednesday, May 29, 2013

CHED - Update

Project CHED (Combined Hardware Emulated Drives)

I have finally got CHED to work. I did a working presentation at OzKFest (www.ozkfest.net) which was held on 27-28 July 2013. A summary of my presentation is as follows :-

There are many solutions providing mass storage for the Apple II. Many of them have come about since I began construction on my own solution. I have tried to list and classify the ones that I am aware of. You can see where CHED fits into the picture.

Disk II Port - Disk II protocol
Semi-Virtual Diskette (SVD) - www.thesvd.com
bootZero - www.bootzero.com/HDDD_A2_v1.2/HDDD_A2v1.2.html
SDISK II - DISK II emulator for APPLE II - http://tulip-house.ddo.jp/digital/SDISK2/english.html
and http://tulip-house.ddo.jp/digital/SDISK2V1/english.html
USB AII-SPI-DSK - http://apple-crapple.blogspot.com.au/search/label/Disk%20%5D%5B
CHED - http://lukazi.blogspot.com.au/search?q=ched

Disk II Port - Smartport protocol
Apple //c Smartport Compact Flash Adapter - http://www.users.on.net/~rjustice/SmartportCFA/SmartportCFA.htm
Smartport Virtual Hard Drive (SPVHD) - www.spvhd.org/

Apple II Slot - Floppy Drive (Replaces the floppy drive controller as well as the drive unit)
Double Action Pseudo Disk / PseudoDisk2 - http://alexfreed.com/FPGApple/pseudodisk.html
  and http://www.applelogic.org/PseudoDisk2.html
iDisk - https://sites.google.com/site/idiskapple2/home
SD DISKII Emulator - http://cafe.naver.com/appleii/13931

Apple II Slot - Hard Disk Drive (Replaces the floppy drive controller as well as the drive unit)
Apple II IDE/ATA interface - http://s.guillard.free.fr/Apple2IDE/Apple2IDE.htm
CFFA / CFFA3000 (inludes floppy emulation) - http://dreher.net/?s=projects/CFforAppleII&c=projects/CFforAppleII/main.php
Microdrive IDE controller - www.reactivemicro.com/
Focus IDE HD Controller - http://16sector.com/

Serial port
Apple Disk Transfer ProDOS (ADTPro) - http://adtpro.sourceforge.net/
ADTPro Virtual Drive - VSDRIVE - http://adtpro.sourceforge.net/vdrive.html
Pocket Serial Host (Uses VSDRIVE) - http://osgeld.a2hq.com/category/projects/pocket-serial-host/
A2CLOUD (Uses VSDRIVE) - http://appleii.ivanx.com/prnumber6/category/a2cloud/
Apple Game Server - http://a2gameserver.berlios.de/
    and http://sourceforge.net/projects/a2gameserver/

AppleTalk Network
A2SERVER - http://appleii.ivanx.com/a2server/

Ethernet
ADTPro Virtual Drive - VEDRIVE - http://adtpro.sourceforge.net/vdrive.html

Speaker port
Online Apple II Game Server - http://asciiexpress.net/gameserver/
Online Apple II Disk Server - http://asciiexpress.net/diskserver/
Cassette tapes using a music payer (PC/iPad etc). Source data from Brutal Deluxe Software http://www.brutaldeluxe.fr/projects/cassettes/index.html

Joystick Port
Apple //t - http://atomsandelectrons.com/blog/2010/04/apple-t/


CHED is a replacement of the floppy drive unit and still requires the controller card to function.

I'm aiming for CHED to replace all three generations of the Apple II floppy disk unit.

Generations :-
1. 5.25 inch floppy disk.
2. Smartport.
3. 3.5 inch floppy disk.

Here is a list of the Apple II models and the generation of floppy disk that they can operate :-

  • II - 1
  • II+ - 1
  • IIe - 1
  • IIc - 1
  • IIe with Liron or Superdrive card - 1, 2
  • IIc with ROM 0 or later - 1, 2
  • IIGS - 1, 2, 3
  • IIc+ - 1, 2, 3

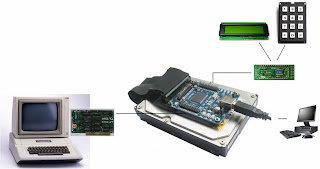
The hardware construction for CHED looks like this :-


  • Atmega128 handles the user interface, hard drive access, protocol conversion and the Apple II interface.
  • IDT72125 Parallel to Serial FIFO chip handles the read signal data because there is not enough CPU time left to bit bang this out of the Atmega128.
  • LCD and keypad allows selection of which disk files to use.
  • ATA hard drive stores the dsk and nib images under FAT32.
  • USB to IDE converter allows easy access to files on the hard disk. 

Currently only the reading of disk files has been implemented ie writing to disk files is yet to come. The USB to IDE interface has yet to be implemented. Using SD media would simplify the design but I'm still committed to creating a more durable solution.

With this design I have found that the amount of memory has been limiting. More memory would allow a better implementation of FAT32 (specifically having directories) and implementing caching so that the hard drive can reduce the amount of reading it needs to do. Also adding a buffer between the LCD/Keypad and the Atmega32 would improve the feel of the user operation.

With these issues in mind I have embarked on trying a different platform to make things easier for myself.


I'm currently playing around with a Cypress Development board to see if I can improve on my previous design.

Friday, February 1, 2013

IIGS Monitor - A2M6014X - Replacement


It wasn't until my last working IIGS Monitor died that I went looking for alternate solutions. In the meantime a composite monitor would suffice but for the long term an RGB solution was certainly needed. It's times like these that you consider the thought that you can never have too many spares.

I have included here a summary of links to several solutions. Each solution works in varying degrees compared to the original. To obtain an alternate solution the cost in time and money will greatly depend on what other resource you already have or can get a hold of easily.

RGB to RGB
    http://apple2.org.za/gswv/a2zine/faqs/Csa2MONITOR.html#015
    http://vintageware.orconhosting.net.nz/apple2/scart.html
    http://www.jomac.net.au/parts.htm (Universal Replacement Chassis for arcade monitors)

RGB to YPbPr (Component).
    http://damntechnology.blogspot.com.au/2008/08/apple-iigs-rgb-video-to-component.html
    http://tulip-house.ddo.jp/DIGITAL/ANALOG_RGB_COMPONENT/english.html

RGB to VGA
    http://www.maricondo.org/
    http://noboot.com/charlie/cbnotesgs2.htm
    http://www.ebay.com.au/sch/i.html?_odkw=RGB+to+VGA+HD&_osacat=0&_from=R40&_trksid=p2045573.m570.l1313.TR0.TRC0.XRGB+CGA+EGA+to+VGA+HD&_nkw=RGB+CGA+EGA+to+VGA+HD&_sacat=0

RGB to all of the above.
    http://www.vintage-computer.com/vcforum/showthread.php?34785-Using-an-LCD-monitor-on-a-IIGS

After checking out the available options I decided that the best solution for me was to get a replacement monitor. Some solutions came close but nothing gives a picture that is as good as the original. I'm also used to having a monitor that looks like it goes with the other parts of the system, especially when it's on display. Being in Australia and needing the 240 volt version (A2M6014X), it was going to be very difficult to track down. These monitors don't come up for sale very often so while I keep my eyes out for a replacement I was going to try and repair the ones I already had.

The first thing to do was to get hold of some schematics. The closest I could come up with where the ones for the 110 volt model (A2M6014). The schematics are available from here :- http://apple2.info/downloads

I removed the monitor casing and the only circuit board that I had a clear view of both sides was the power supply. This was the section I was mostly concerned about so it was a good starting point. I compared the schematics and to my surprise I was able to follow along quite nicely. I was able to see where the 110 volt parts where meant to go because the circuit board had been designed for both 110 and 240 volt systems. The relevant parts were populated and the alternate power parts were missing but there was room for them on the board and the vias were there too. I quickly realised that the diagnostics and repair was beyond my current skill level. However I now had greater confidence in the possibility of getting it repaired. I wasn't going to pull the monitor apart any further so I don't know if the rest of the schematics matched my setup but I figured it would be pretty close.

I set about finding someone who was able to repair the units. My first thought was to find a TV repairer. All the ones that I contacted were not interested in repairing my devices. I did however manage to track down a repairer who specialised in arcade machines and he was located only a few suburbs away. His website is :- http://members.optusnet.com.au/~paul_ridgway/
He was keen on giving it a go. I supplied him with two faulty monitors, the A2M6014 schematics, a IIGS and instructions on how to perform a diagnostic self test (this displays a test pattern). I was hoping that, from the two faulty ones, he could get at least one monitor up and going. He blew my expectations out of the water when he informed me he had fixed both. He also had the pleasure in telling me that these monitors were designed to be worked on, the circuitry was straight forward and all the parts were still readily available or easily replaced with compatible components.

This was fantastic news. Now I'm back to where I wanted to be. However, I'm not ruling out the possibility that I'll find and use a great alternate solution some day.


Power supply board showing the space for alternate power components and a IIGS Monitor showing the self-test.


Update: 5th January 2015.

I was asked to help convert one of these monitors from a 110 to a 240 volt version. I took apart my monitor and documented the differences between it and the schematics that I had of a 110 volt model. I suspect it's just the power board that needs converting. Here are the details of what I could make out.