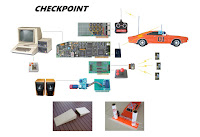
CHECKPOINT is based on classic arcade style driving games where you go from point A to point B via checkpoints and do that within certain time restrictions. However, unlike the typical driving game which is computer generated, CHECKPOINT relies on the user driving a real vehicle, not a full-size vehicle although it could be done but a remote-control toy vehicle. The camera feed from within the vehicle results in the game screen showing the driver's perspective as it speeds around the track. The aim of this project was to take the user back to a time of remote control cars, slot cars and train sets, a time when a kid would dream about having a conversation with talking Pontiac Trans Am, time travelling in a Delorian or jumping a police car in orange Dodge Charger.
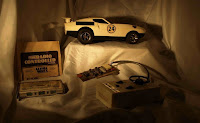
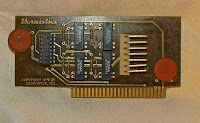
It was four years ago that I was trawling through ebay looking at Apple II related items. It made my day when I came across a hidden gem lurking amongst hundreds of generic items. The ebay listing was a complete set of items that formed an Apple II based remote-control car controller. Included in the listing was a commercial branded (Heuristics) relay board, software in the form of a cassette tape, a modified hand controller and a LaTrax Alpha RXC remote-control car from 1978. At first, I thought that this was one commercial product due to the Heuristics stickers plastered over the car and hand controller. It didn't take me long to realise that this was actually two different products. This is an amazing set and to me it represents the early days of computer control in the form of a toy project.
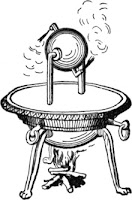
Toys are often used to display principles that later become life changing events. Take the Aeolipile (Hero's Engine) for example. It was developed around the year 100 AD and it show cased principles of steam power. It wasn't until the 1500s that steam engines became useful and the 1700s that steam power helped drive the industrial revolution. I found this ebay listing fascinating and I consider it a great example of early computer control with telecommunications. In just a few decades these principals have radically changed the world I live in compared to the world my parents grew up in. I can imagine someone seeing this set operational in the late 70s and wondering what their future had to offer just like I watch science experiments today where super conductors are suspended in mid air and wonder what the future has install for me.
I would have loved to have purchased this great bit of history however the price tag of nearly AU$1000 was a touch above my budget. Realistically I could have purchased it but I just couldn't bring myself to do it. I'm not a museum. I'm a tinkerer and the concept fascinated me more than owning the equipment. What stumped me from the listing was how many pins were being used between the relay card and the hand controller, seven in total. For controlling the car (four controls are required - Forward, Reverse, Left and Right) so I would have guessed that five or eight lines may have been needed but seven? This seemed like a strange number to me. To satisfy my curiosity I contacted the seller and requested more information. The seller provided me with a photo of the underside of the board and gave me some background as to where this set was being used. It turns out this set was being used in a car dealership as a conversation starter. I can just picture the sales person now, saying "Here are the keys to your new car sir. Next time you purchase from us we may have a car that will drive you home." I had a chat to the seller and we discussed how this set could be made functional again. I don't recall if the seller had an Apple II but they certainly didn't have a cassette player.
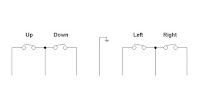
After tracing it out it all made sense.
Now that I had information on the relay card I wanted to see if there was anything special about the software. Obtaining the software from the seller's original cassette tape was not an option. I knew that Brutal Deluxe Software had an archive of Apple II cassette tape images so that was my first point of call. Unfortunately, in this case they didn't have the tape I was seeking. But that didn't stop me from checking the website every few months. About a year and a half later I checked once more and to my surprise there it was. Wow, how often do you get to find something so obscure and rare. I took the wave file and ran it through CiderPress to obtain the program. Reading the program confirmed my suspicions that there was nothing fancy going on. One just needed to poke the first byte of the card's address memory with the byte containing the appropriate bits that corresponded to the four relay switches. The program was written in Basic and was used to select a group of preconfigured movements. These preconfigured movements would then be sent to the relay card which controlled a toy car or robot or anything else that could be controlled with a few switches. Even though I didn't find anything useful in the program I found the programming style very interesting. This was early days of home computing and the style very much represented that.
Stuck with this information I wanted to reproduce something similar to this set. What I needed was to get my hands on a remote-control car. I could have popped down to the local shops and picked up a generic remote-control car however interfacing to it may have been a problem and it just would not have been inspiring enough. I decided to track down something more attune to my childhood. I had other projects to work on so it took a year or so before I found something that was affordable and would suit my purposes. The purchase was for two Hitari built remote-control cars (KITT and the General Lee). I figured that this would give me plenty of spare parts, the electronics would be through hole and easy to work with and if I could work out a way of changing the frequency on one of the cars then I could incorporate both cars into the project.
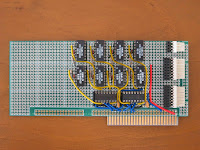
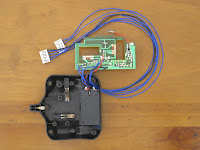
While waiting for the cars to arrive I built and tested the relay card. This relay card is based on the Heuristics one but contains eight switches instead of four and can be easily configured for different connection scenarios (to my LEGO robots). The cars arrived and I configured one of the hand controllers to the relay board. These cars have digital control circuitry (compared to the LaTrax Alpha RCX which has analog) so the wiring to the relay board is different. The Hitari cars also have six controls instead of four. The extra two are for the horn and the second forward fast speed. A simple basic program was written to take the Apple II joystick movements and use them to control the remote-control car. All this went smoothly and to plan.
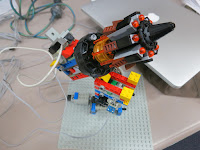
Playing with the Apple II and the toy car was good for about five minutes. After that other pastimes looked more interesting. This may have been a spectacle in 1978 but in 2017 it's old hat. I had to find a way of making this more interesting and since OzKFest was only a few months away I wanted something to present that wasn't going to be outdone by the likes of Jason and his LEGO Cannon. Jason's LEGO Cannon is an Apple II controlled firing device constructed from the Boulder Blaster 70747 Ninjago LEGO set and using the LEGO TC Logo parts for movement control. A pinhole camera is used for targeting. Jason presented this at the last OzKFest event.
I decided the best way forward was to make a game out of it. Hence CHECKPOINT was born.
The first enhancement step was to add a video feed to the car. This was done by purchasing a miniature camera and a composite transmitter receiver pair. I could have gone with the more expensive hobby quality stuff but to limit the weight and power supply options the toy class parts seemed more suitable. This worked great after being wired up. So I thought. There was an angry mob outside my door when the household realised that it was me who had been disrupting the home WiFi network with my project. Things settled down after I located the manual online and found I was able to shift the transmission frequency outside of the home's WiFi range.
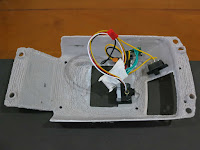
I decided to mount the camera and transmitter inside the remote-control car but in a way without damaging the vehicle. I took it apart and removed the internal shell which made up the windows and roof support structure. By scanning the shell and 3D printing it I could make the required modifications and have the option of returning the car back to its original state if needed. I borrowed a friend's Makerbot Scanner but due to the complexity of the car's shell the 3D models it produced were less than optimal. I found that taking fifty odd photos of the shell and running them through Autodesk's ReMake software produced better results. I went through a few iterations of this before I was happy with the outcome. Only a small amount of editing was then required on the 3D model to smooth it out. Dean helped me with the 3D printing and we got the scale right on the second print. A work college helped me out with the painting options.
To display video from a wireless camera the setup only requires a composite monitor. However, because I wanted to mix the video signals and the computer generated text in the form of a game I needed to incorporate a genlock card. It so happens that I had a genlock card (the Apple Video Overlay Card) just lying around waiting to be used. I had been wondering what to do with this great under-utilised card and now I've found a great use for it. I played around with some timer code in Basic and displayed it as a countdown clock on the screen while having the video feed playing in the background.
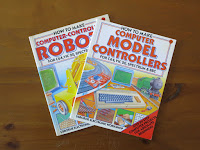
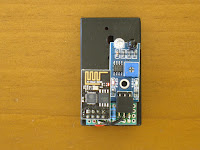
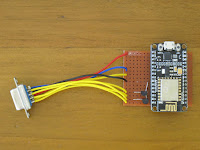
Having the timer was great but there was no way of determining when the car had reached its destination. I didn't have anything that would inform the computer of the car's position. I had a few Usborne books from the 80s that showed me how sensors could be wired from slot car sets or train sets or robots to relay back the information to the computer. However, I didn't want to go about running wires everywhere. These days we have plenty of wireless solutions like Bluetooth, RF, ZigBee, WiFi just to name a few. I've had my eye on the ESP8266 WiFi modules and so I figured I could use these for the project and be able to play around with them at the same time. I ordered a handful of them. The cheaper modules I setup as clients since all they need to do is receive a digital signal from a sensor and pass that information onto the server module. I experimented with various sensors (switches, infra-red modules) that would trigger from a passing car. I had issues with using the cheap infra-red sensors during the day time due to the amount of sunlight in the room and their sensing distance wasn't as far reaching as I had hoped. More work needs to be done in this area to get a better solution. The more expensive WIFI module (NodeMCU) brings out many Input/Output pins so it serves as the server which receives the digital location signals and passes them onto the computer via an input card. I used the 4play card for this because I had one on hand and it was easier to setup and use than my other input cards.
The beauty of using the 4play card is that I could now change over from using an analog joystick to using a digital one. The digital joystick is a perfect fit for this type of situation because it matches the four position digital control of the car very closely. The speed difference between processing a digital joystick vs processing an analog one is quite large especially when it's being done in Applesoft Basic.
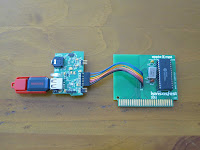
The last peripheral card that I used for the game was another under-utilised card called the A2MP3 card. It allows you to play, stop and pause mp3s under computer control. Since I'm no musician and to add music to CHECKPOINT would have taken me a considerable amount of time, it was easier for me to sample the theme music and play it back during the game. Since this game is a very customised solution I didn't mind using the A2MP3 card for the game sounds and background music. Using the A2MP3 card was not a trivial procedure. The problem was that I didn't have an A2MP3 card and Vince no longer sells them. I could have borrowed one but there was another option. I had the PCB of the A2MP3 card which I used for my serial Bluetooth concept a few years back. I was missing the part that does the USB file reading and the sound generation but the good thing is that these are still available from electronic stores. The original A2MP3 card came with the FTDI's VMUSIC2 module but I purchased the VMUSIC3 because I already had a firmware programmer for it and it was meant to be plug in replaceable. Plug in replaceable it was not. This was due to Vince using improved firmware in the VMUSIC2 module. I had two options. I could rewrite the firmware for the VMUSIC3 module or I could change the A2MP3 software and do a modification to the A2MP3 base card. I chose the second option since it was the quickest solution and I was quickly running out of time.
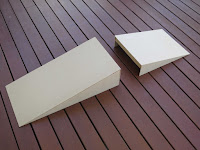
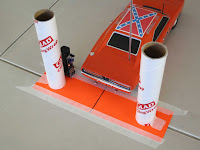
I put together the game code, double hi-res title screen, a few theme related props and the OzKFest Powerpoint presentation. This only left me with just one day of system testing. On this day I found out that the noise (electromagnetic interference) generated by the car's motors was enough to cause the video feed to drop out. After giving the video camera and the transmitter its own power source I found that the drop outs had reduced but had not been eliminated completely. This is a classic engineering problem however it's a shame I didn't have enough time to get this sorted before the OzKFest event. There are still many improvements to be done however at least now I can work on them at a less stressful pace.
Thank-you to everyone who helped out with the project. Thank you to the tool builders who make my life easier and thank you to those that take the time to archive and preserve our retro artrfacts. Without these efforts, I would not have been able to do what I do and be able to experience these great extensions of my childhood past. This project is a great example where things are only possible because I have been able to stand on the shoulders of giants. Cheers.
Code and video to follow (one day).