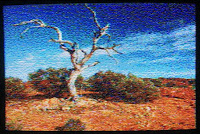
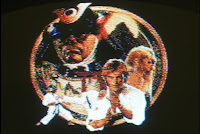

These title pictures are photos taken of a composite monitor attached to a standard Apple IIe with an 80 column card.
Double High Resolution Graphics (DHRG) is the highest resolution of graphics that is natively supported by the 8bit Apple II line of computers. DHGR mode is not available on the earlier models but it is available on the IIe (with a RevB motherboard and an 80column card), the IIc and the IIGS. The monochrome resolution is 560x192 but when using colour this resolution falls back to roughly 140x192 since a block of 4 bits is used to represent 16 different colours (15 colours on the IIe because the two greys produce the same colour). Even after 1986 when the the IIGS was released, my school, myself and many people that I know were still using the IIe with a monochrome monitor. By the time computers with colour monitors were affordable, colour graphics had surpassed DHGR type graphics. Most people will attribute the Apple II with High Resolution Graphics (HGR) and when you compare it to its competitors at the time I believe colour DHGR did not get the opportunity to be represented as much as it could have been. This blog entry is about trying to build a colour relationship model, to show how that can be used to improve the areas where DHGR is used in design and to show off what could have been.
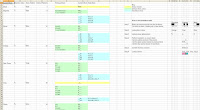
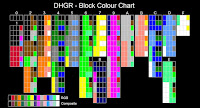
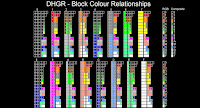
There are references on the web that describe how DHGR came about, how its colours are made up, how DHGR can be programmed and and how the data is stored. Each of these could be discussed at length in their own right but I will not be covering them here today. It was when I was building colour into the A2VideoStreamer that I wanted to know how the colours related to one another but I wasn't able to locate the information easily. I ended up generating a lookup table that gave me the result I was after but I was not content with just using this table. I wanted to delve deeper and understand how the underlying relationships worked. Rearranging the data I was able to put together an Excel spreadsheet showing this relationship. I took this even further and constructed the list of actual block colours and the block relationship table. The source of this data is not based off analog video signals but instead on AppleWin's pixelated estimates of these signals so it's not perfect but it is very good and it helps me to visualise what's going on. I'll be using these simplistic digital models until I can work out the analog ones.
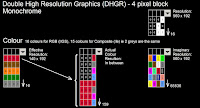
DHGR (in terms of the display) is cut up into 4 bit blocks. You can think of these 4 bit blocks as items in a pull down box. The resolution of 560x192 relates to the monochrome image. For a computer to produce a coloured image at 560x192 (let's call this the imaginary resolution because just like imaginary numbers in mathematics they can't be realized but they are still useful in calculations) it would need to store 4 bits per pixel. The Apple II only has 1 bit per pixel so it only has the capacity for a storage / effective resolution of 140x192 where each 4 bit block corresponds to one of the sixteen colours. The actual resolution that is displayed on the screen is better than the effective resolution. It's somewhere in between the effective and the imaginary resolutions. What makes this feat possible is that each block's pixel colours are affected by its neighbouring block (on both sides of the block).

I don't know if Dazzle Draw was the first program I ever saw containing DHGR but I do remember being amazed by its sample images, especially the monarch butterfly and the room images. I was impressed by how the images made very good use of dithering and made the most of composite colour blending. Sadly, as much as I tried, I was never able to produce images to the same caliber as these examples. Now was my chance to have a good crack. Here is an example I prepared earlier that shows how changing a block of colour changes the actual display.


If we have a line of magenta coloured blocks and we place a single green block in the middle of that line we end up with merging of colours. Some of the green block's pixels change to yellow and black. What also happens is that a pixel in the left magenta block is altered to grey and three pixels in the right magenta block are changed to black. What we see here is that going from the effective resolution (how data is stored) to the actual resolution does not always produce a nice even merge of colour. This results in unwanted artifacts when viewing an image. The colours Magenta (represented in bits as 0001) and Dark Blue (represented in bits as 1000) are probably the biggest contributors in creating this effect and that is because merging with other colours can easily produce these long streams of zero bits resulting in a transformation to the colour black. Other groups of colours can also produce unwanted artifacts. This is not all bad news. Effects like these can be used to our advantage if that is what we want the final outcome to look like. The merging of blocks can be visualized by looking at the block relationship table above.
So why does this information matter and what can it be used for? Well for one, in its simplest form, it was great help when reconstructing a colour image from just a single video bit stream coming from the IIc and IIe. It would greatly help in developing new fonts or graphics editors on modern machines. It can help in improving graphic converters and assist in game development. I believe that we could have had more DHGR content produced if the complexities of DHGR data storage were encapsulated away from the programmer and the graphical artistic part of the design was better documented and concentrated on. How many of today's Apple II software developers would be keener on developing in DHGR over High Resolution, Low Resolution or Double Low Resolution? Let's use this information by putting some theory into practice.
There has been some fantastic work done over the past few years in getting modern images converted over for Apple II display and even more recently having wrappers built for these tools making this process available to the masses (as much as masses can get in the Apple II community). I looked at a few graphic converters (Sheldon's tohgr and Bill's bmp2hgr) and I noticed a few things that made me question what was going on. They made me wonder if we had reached the pinnacle of the DHGR display or if there was still more juice left in the tank, so to speak. I went about trying to test out my suspicions.
In terms of DHGR, these converters were taking an already pre processed image in the effective resolution (140x192 24bit colour) or converting an image first into the effective resolution before doing the processing on the image to turn it into something that was compatible with the Apple II. So instead of going from the effective resolution and working up to the actual resolution I wondered if going from the imaginary resolution (560x192 24bit colour) and working down towards the actual resolution could produce better results. Knowing the DHGR block colour relationship would be critical in testing out this theory.
I started by ripping apart tohgr. This sounds brutal but it really wasn't. Since it has a good structure and a simple approach to the conversion solution it provided a good base for me to add my own extensions. The first thing to get working was colour quantisation. Colour quantisation is the process of reducing the number of colours in an image. In this case we are reducing a 24bit colour into a 4bit colour image.
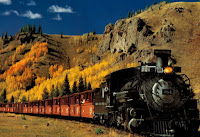
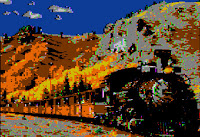
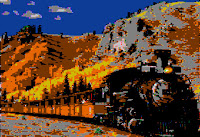
Here we have the original and two converted images using colour quantisation. The one on the left contains many artifacts which the eye picks up as anomalies. There are few main reasons for this.
- Processing in the effective resolution and allowing the Apple II to convert to the actual resolution as shown by my first example is not great. By knowing what the pixels are actually going to be displayed you can minimise this effect. Using the actual colour block list (list of 159 blocks vs treating the block as one colour ie list of 16 blocks) results in a better outcome.
- Inherent difficulties in trying to represent what our eyes pick up. I don't know of any algorithm that will produce a perfect result. Just because mathematically a picture should look good does not necessarily mean that it will. Mathematically (on average) you should be comfortable if you have one leg stuck in a bucket of hot ashes and the other leg in a bucket of ice however our bodies don't necessarily work that way, especially our eyes. Our eyes perceive different colour frequencies in different ways. Extra processing is needed to limit psycho visual effects.
The image on the right has been processed twice to remove some of the anomalies.
Apart from being able to remove more of the visual faults when using the imaginary resolution instead of the effective resolution we are able to preserve more of the detail of the image. Does this make it a better picture? It all depends on what you want to see. Most of the time is does produce a better image. On occasion there is a compromise between detail and colour quality. You can see an example of this in the thin straight lines on the pilot of the train. Only a few colours are able to give this single pixel thin line over a black background. Therefore the choice is to have thin lines in a limited colour set or thicker lines that match the colour better of the source image.
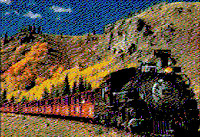
The next step was to move onto producing dithered images. Dithering introduces noise to an image in a way that makes our eyes average out the colours there by tricking the brain into believing that there are more colours and smoother contours. Because of the introduced noise some of the anomilies that were clearly a problem with colour quantisation are now disguised within the dithering pattern. Knowing the colour relationship helps to iron out these unwanted artifacts. For comparison I have included here the dithered version of the train. Note that the converted images are just previews from the program A2BestPix. The actual output on a composite monitor will have many different factors which will determine how it looks.
There are lots of different dithering methods. Error diffusion wasn't the first dithering method I tried but so far it has produced the best results. With dithering it is inevitable that some detail from the source image will be lost compared to colour quantisation, especially when the image contains small objects. In some cases one may be able to use the best of both worlds and be able to manually cut and paste between the dithered and colour quantised results.
The first thing I tried in terms of dithering was not to implement any dithering code at all. I wanted to test the generation of dithering in an external graphics program called GIMP2 and then just perform colour quantisation on the externally dithered image. The result wasn't all that great. Here we see four pictures. From top to bottom we have one pixel block, two pixel block, three pixel block and four pixel block dithering. So why does the result look so bad? The reason is in the limitation of the Apple II video mode. Dithering models have been developed to alternate two separate single pixels. The four bit blocks of the Apple II do not fit in very well into these models. Looking at the relationship table and the list of actual colour blocks we see that we can't produce a picture with two alternating single pixels. Even alternating two pixels of the same colour at a time is difficult. For example, alternating a block colour 5 with block colour A (in terms of pixels) results in 2 light blue, 2 pink, 1 grey, 2 green, 1 grey and alternating a block colour 5 with block colour 2 gives 3 grey, 2 orange, 1 brown and 2 green. The majority of colours can only be alternated when we use three pixels of the same colour. This means we either treat the whole block as a single colour like existing graphic converters do or we modify / develop new dithering models. I chose to try out the second option.
A good number of revisions later (dozens and dozens of revisions actually) and the results look like this.
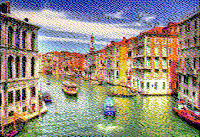
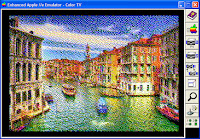
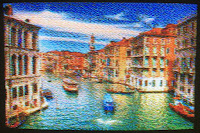
A2BestPix Preview. AppleWin NTSC. Photo of the Sony CRT monitor display, using a standard Apple IIe (including an 80 column card).
I can't actually show you how this looks on a real composite monitor because each of these methods is only an estimate. Even the photo of the composite display will have losses / colour adjustments due to the physical camera limitations and file compression routines. Every different model of monitor is going to yield different results. Then there is the PAL/NTSC difference. I chose to display the AppleWin NTSC in "Television" mode instead of "Monitor" mode as that is how it looks on my Sony monitor. The pictures on this blog are quite small so when you view these on a standard composite monitor you will see pixelation. I guarantee it. Unless you're using a one inch screen. It's great considering the technology but don't go expecting HDMI quality stuff. To get the full effect you can download the dsk images attached and view them on real hardware.
Here are a few more examples of what is possible.
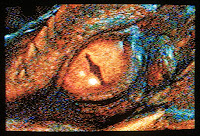
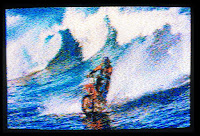
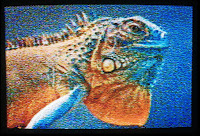
If one was really obsessive then these pictures could still be manually touched up in something like Dazzle Draw.

Modeling the way dithering works on multiple pixels was required. We can't just process an individual pixel because the Apple II works in blocks of four but we can process individual pixels and spread the error over the neighbouring blocks. There are so many different ways an error can be spread out. I've implemented just a fraction of what is possible.
There are just as many options when processing the lines as there are processing the blocks. A left to right processing can look very different to a serpentine or even a right to left processing. Not just in terms of the dither pattern but also in terms of the colour propagation. Other factors such as using "<=" instead of just "<" in colour comparisons results in large changes. Shifting the entire image by one, two or three pixels can have a huge difference on the final result.
Dealing with four pixels at a time results in such varying outcomes. Each image source is different as each will have a different way that it lines up with the Apple II blocks. There were so many different combinations that testing which ones were going to produce respectable results was a problem. To produce every single outcome and compare that on the Apple IIe would have been tremendously time consuming. A good preview of what was going to be produced was needed. I had a look at AppleWin NTSC and this produces quite good results but still converting every processed image into a dsk file and using AppleWin to compare would also take up a considerable amount of time. I had to develop a preview using the conversion code. To get a good preview two things were needed. One was knowing how the video is translated from the effective resolution to the actual resolution and having a second independent palette from the processing palette. Both of these I had so I was able to generate a bulk number of preview files and flick through them to pick the best ones.
Working with four bit blocks also causes other issues. Some times the preview can look great but when looking at it on a composite monitor the eye picks up tiny anomalies. You can end up with results where the image will look 99.9% correct but a straight line or colour tinge in the wrong place can make a section of the image look unnatural. You can get instances where the foreground looks great but the background looks average and then another image from the same source results in a great background but an average foreground. That is the reason why I generate several previews using the same source image.
Why DHGR and not the other video modes? Once you get DHGR right then all the other video modes on the 8bit Apples are just restricted subsets. This may not necessarily be the case with digital models but I suspect it will be when using analog ones. I looked into using different dithering techniques, Yliluoma3 and Riemersma, but so far the results have not been as nice as I would like them to be. Error diffusion is not all that great for animation purposes so it would be nice to get these other methods perfected so that they can be used with video and game development. This will most likely benefit the other video modes.
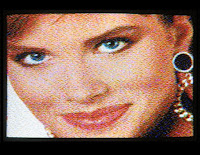
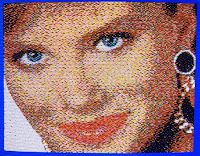
DHGR comparison between the IIe and the IIGS using the same demo disk.
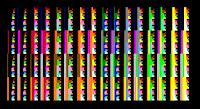
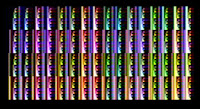
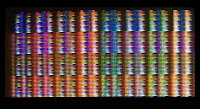
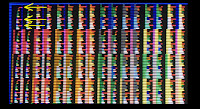
Test pattern: AppleWin, AppleWin NTSC, Composite and RGB.
Displaying these images on a IIGS does not produce the same result. This is because the IIGS does a conversion to RGB (and then again to composite if using the composite port). This results in a different colour palette. The RGB image is sharper than composite so the blending effect of dithering is not as pronounced. Also the conversion process changes the colour relationship. Check out the difference between a test pattern for a composite machine compared to the IIGS. There are instances here that when certain blocks are brought together you get this long red run. ie 0001 0000 1000 turns the middle block red. When I first saw this I thought my IIGS was faulty but I have since tested several IIGSs and a Video Overlay Card and they all produce this same result. I have not seen this behaviour reproduced on any of the IIGS emulators that I have tried. To generate nice looking DHGR on the IIGS requires a different colour palette and a different colour relationship model. Since the IIGS has different video modes that can impress I did not spend any time trying to optimise any DHGR content for it.
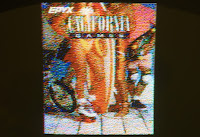
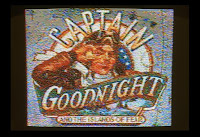
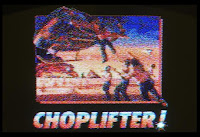
Box art in DHGR.
Imagine having title screens like these for our favourite games. Box art could have been brought into the user computer experience and not just be limited to the packaging. If this is the result that can be produced by a layman like me then imagine the stuff that could have been produced by a professional graphic artist. I'm not talking about the actual content here. That was sampled from packaging but instead displaying art on the screen and using the resolution to its fullest.
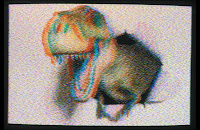
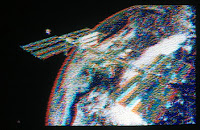
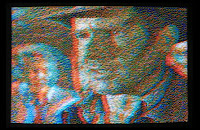
Here are some results of anaglyph 3D. I pulled out my 3D glasses and had some fun with these 3D conversions. Not bad for 70s technology and a for computer that doesn't even have a video chip. There is so much more that could have been done with this video mode.
Here is my graphic conversion process:-
- Screen capture an image or just load a graphic into Microsoft Paint.
- Cut and paste the section that is needed into a new window. Add black lines to the sides if needed (or the top and bottom) or crop the image and adjust until the graphic ratio is close to 4:3. Save it as a 24bit bitmap image.
- Load the image into Gimp2 and resize it to 560x192. Adjust the colour, contract or brighness if needed. Save the image.
- Rename the file to source.bmp and place it in the same directory as the A2BestPix application.
- Run the application. This will produce several files in the same directory as the application. I have yet to implement external control of the processing options.
- Using the preview files I choose the preview that I like the best and note down the equivalent *.dhgr file.
- O.bmp is the original image file (source.bmp) but stretched vertically so that it looks nicely ratiod.
- Q.bmp is the colour quantised preview.
- Q.dhgr is the colour quantised Apple II graphic file.
- D_xxx.bmp are the dithered previews.
- D_xxx.dhgr are the dithered Apple II graphic files.
- I already have a modified dsk file containing a DHGR demo program written by Bill. I modified the program to use picture names PIC1 to PIC5. Open the dsk image with CiderPress and delete any existing pictures.
- Leaving CiderPress open select the *.dhgr file and load it into the dsk image. Rename to PICx.A2FC where x is between 1 and 5.
- Change the file type to BIN-06 and aux type (hex) to 2000. Close CiderPress.
- Open the dsk image using AppleWin NTSC and double check the demo program.
- Copy the dsk file over to the IIGS's hard drive.
- Use DiskMaker8 on the IIGS to generate a real floppy.
- Reboot the IIe using the floppy disk to test the demo program.
Attached are a few demos of my conversions. A2BestPix is also included. The program is still a work in progress but the source is included as reference. https://docs.google.com/open?id=0B5PVarmqxaOnSWRJVm94al9pc2c
Until next time, happy dithering.